This document contains a guide for running firmware on the remote device as part of your CI process.
CI/CD techniques are coming to the embedded world and now the All-Hardware service is enabling remote access to Arm Virtual Hardware virtual boards as well as to physical boards.
This demo is intended to show how to speed-up the process of the embedded firmware development by using automation for the firmware testing on cloud hardware.
Here we’ll run a simple echo application on a single Cortex-M55 core of Corstone-300 development board using GitHub Actions and REST requests wrapped with the shell scripts. Using this guide you can also run your firmware on any other supported board.
For the time being this demo is using precompiled examples. To get the source code of the examples please contact Arm. Once the source code is available to the public this demo will be updated with detailed instructions for getting the code and building the project.
Getting the CI/CD Access
Please visit All-Hardware’s board selector page and choose the Corstone-300 board, then press “Get CI/CD access” button.
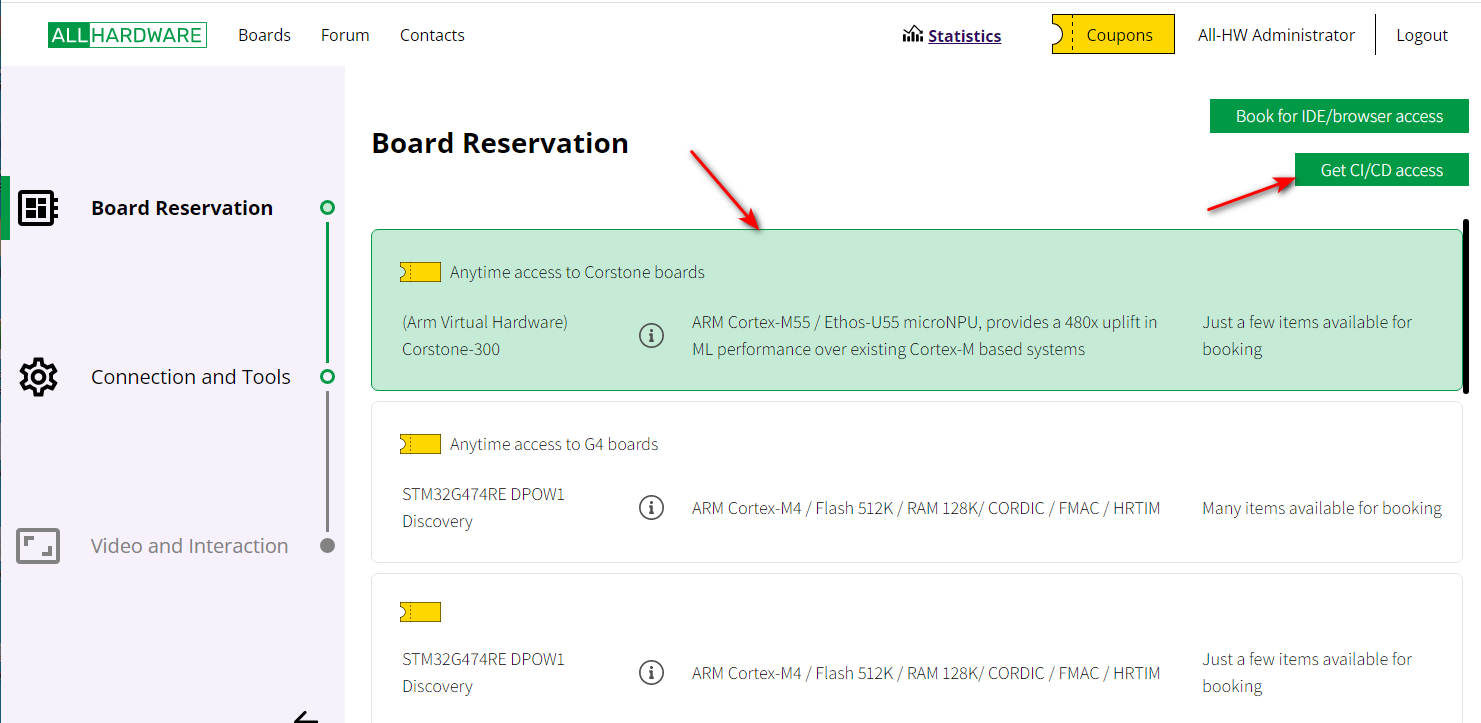
You will get an API key which you’ll need later to access the board. For this demo we’ll use the key 177aa96d-424f-40b2-817c-3034d38c87b6.
Quick Look at the Demo Content
The DEMO project contains:
- UART echo example application
- VHT microspeech example application
- Scripts to upload firmware binaries to the All-Hardware service
- GitHub CI workflow configuration
Ok, great! Let’s flash our simple applications to the cloud hardware.
Flash MCU with GitHub CI
With GitHub Actions you can easily build your CI workflow and the All-Hardware service will support your embedded development process!
Open the demo GitHub page and fork the repository:
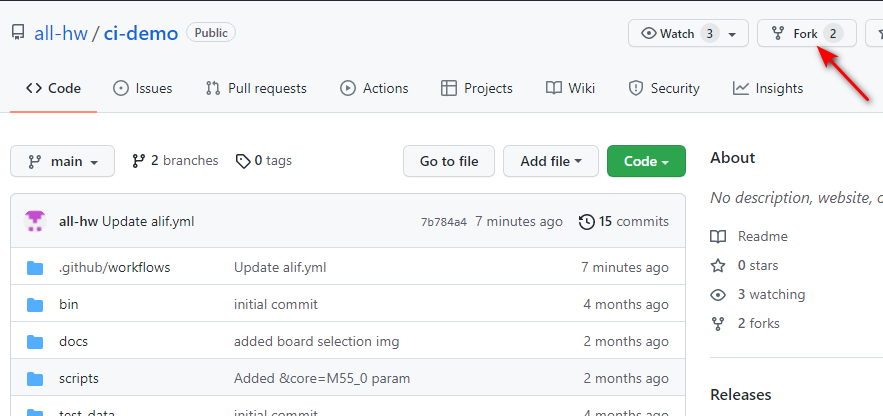
Now you have a fork of the CI demo repository on your account on GitHub. Lets try out the CI workflow:
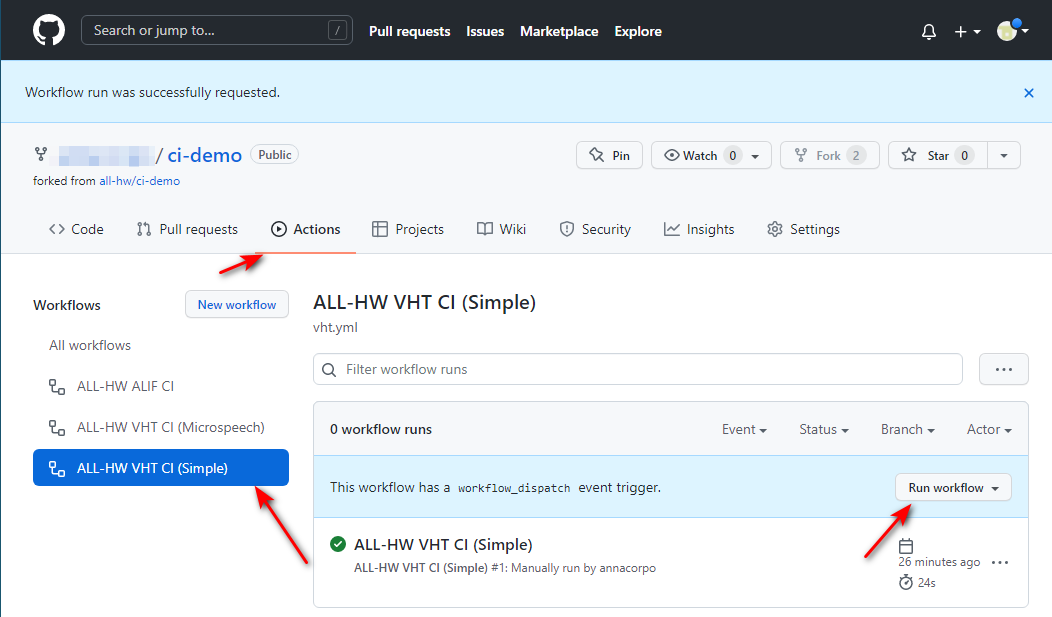
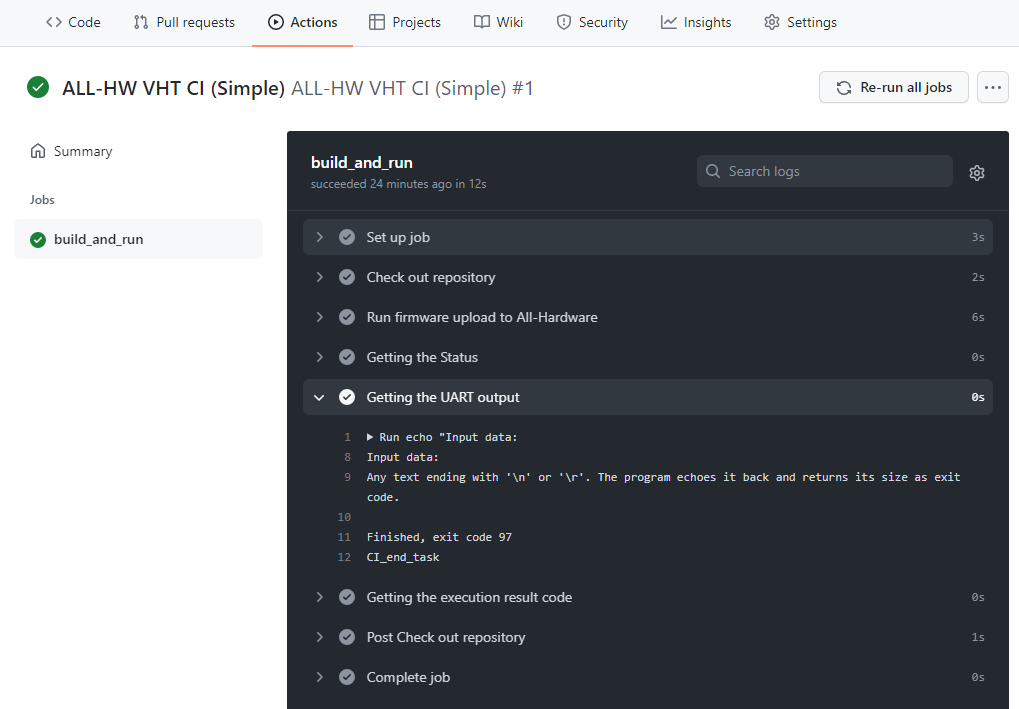
Congratulations! Your project was successfully built and run on the latest Corstone-300 development board!
Now let’s take a quick look at the workflow configuration file:
name: ALL-HW VHT CI (Simple)

on:
  # Manually triggered workflow
  workflow_dispatch:
    inputs:
      # parameters description
      binary:
        description: 'Binary for the task'
        default: 'bin/TestVHT.axf'
        required: true
      file:
        description: 'Input data for the task'
        default: 'test_data/uart_input.txt'
        required: true
      config:
        description: 'ARM VHT config file'
        default: 'test_data/config.txt'
        required: true
      api_key:
        description: 'API key for the all-hw.com service'
        default: '177aa96d-424f-40b2-817c-3034d38c87b6'
        required: true
      timeout:
        description: 'Firmware task timeout'
        default: '10'
        required: true

jobs:
  build_and_run:
    runs-on: ubuntu-20.04
    steps:
    # checking out our repository
    - name: Check out repository
      uses: actions/checkout@v2
      with:
        ref: vht
        submodules: recursive

    # using the parameters provided above we call
    # All-Hardware GitHub actions
    # to upload your firmware to the cloud hardware
    - name: Run firmware upload to All-Hardware
      id: task
      uses: all-hw/vht-task@main
      with:
        binary: ./${{ github.event.inputs.binary }}
        uart-in: ./${{ github.event.inputs.file }}
        vht-config: ./${{ github.event.inputs.config }}
        api-key: ${{ github.event.inputs.api_key }}
        timeout: ${{ github.event.inputs.timeout }}
      timeout-minutes: 1

    - name: Getting the Status
      run: echo "${{ steps.task.outputs.status }}"

    - name: Getting the UART output
      run: echo "${{ steps.task.outputs.uart-out }}"

    - name: Getting the execution result code
      run: echo "${{ steps.task.outputs.result-code }}"
Firmware upload is done by All-Hardware GitHub Actions. You can easily integrate this into your own CI workflow.
Flash MCU with REST API
We’ve wrapped the API requests with shell scripts for this examples. Check out the REST API description.
Requirements: git, curl, jq
Clone the demo from Github repository:
git clone https://github.com/all-hw/ci-demo
git checkout vht
Modify the $API_KEY variable in the file scripts/ci_sampe.sh to the API key you received when booking the board.
Echo Application
Run the following command to upload the Echo example to the All-Hardware remote board:
./scripts/ci_sample.sh task bin/TestVHT.axf test_data/uart_input.txt test_data/config.txt
This will flash the firmware binary from **bin/TestVHT.axf ** and pass the content of test_data/uart_input.txt to the microcontroller’s UART input. Here is the example output:
7b00ab0c-8566-46ae-ada8-45bc2bdc81d4
This is a task UUID, you can use it to get the status of the operation:
./scripts/ci_sample.sh status 7b00ab0c-8566-46ae-ada8-45bc2bdc81d4
The response should look like:
Status: finished
Exit code: 156
Microspeech Application
Microspeech source code is available on GitHub page.
We already built the example so you can just run it on remote hardware without compiling from source yourself. Make sure you’ve set the API_KEY variable as described in the previous example, then run following command:
./scripts/ci_sample.sh task bin/microspeech.axf test_data/speech.wav test_data/config.txt
Then request the status of the operation:
./scripts/ci_sample.sh status b2dc9f02-5829-11ec-bf2c-67fc59cf5b2a
The response should look like:
Executing bin/microspeech.axf on https://cloud.all-hw.com/ci with timeout 10s
Waiting for result... 8a668658-a764-4a15-b71f-afb6c8bdaece
Result code: 156
UART output: =================VVVVVVVVVVVVV=================================
UART is enabled.
Heard silence (153) @400ms
Heard yes (158) @1200ms
Heard unknown (141) @5100ms
Heard no (141) @6100ms
..... more lines here ......

==============================^^^^^^^^^^^^^=================================
REST API Description
Flashing the Firmware
To flash the device, you’ll need to POST the following JSON
{
  "firmware": "......", <-- your firmware here
  "input": "........" <-- input data to send to UART
}
to https://cloud.all-hw.com/ci/usertask?version=V3&rate=115200&log=0&timeout=10&key=<your_api_key>.
As a response you’ll get the UUID of the created task.
Getting the Operation Status
GET https://cloud.all-hw.com/ci/usertask?id=<task_id>
The response to the task status request is a JSON. The fields are described in the table below.
| Field name | Type | Comment |
|---|---|---|
| status | String |
|
| created | Date/time | The time when the task was registered on the CI server. |
| started | Date/time | The time when the task started on the terminal, or an error preventing it from running was encountered. |
| finished | Date/time | The time when the task has completed its work on the terminal, or an error preventing it from running was encountered. |
| code | Int | The return code of the task:
|
| output | String | The output of the task:
|
| reservation | Int | The reservation ID on the All-HW server. This can be useful for diagnosing some problems with the task. For example, you can use it to find out which specific board from the group was booked to complete the task. |